I am very excited to share some tips that I have learned on making sketches on Photoshop. First of all I have to say that I need a tutorial on how to take video of my computer! My intentions were to make a video, but… I failed miserably! So, I opted for detailed instructions (which are harder! LOL) and pictures.
If you want to get the most of making sketches you have to download some patterns and brushes. The ones that come with the program are very limited. But, that can get expensive… so I found this website that has samples for free!! And they have tons of free patterns and brushes!! That site is http://www.brusheezy.com/
Downloading them is the easy part (make sure you create a new folder for them) Installing them, now this is a tutorial by itself!
1. Make sure you have open the folder where you downloaded your brushes/patters on another window
2. Go to COMPUTER >> C >> PROGRAM FILES
3. Open ADOBE >> PHOTOSHOP >> PRESETS
4. In the PRESETS folder you will see the folders for the PATTERNS and the BRUSHES
5. Make sure you unzip them onto the same folder! Then, drag the ones you downloaded to each of these

That’s it!! Easy right? J
On to your sketch! A very important tip before moving on… If you want to undo something, it will let you do it only for the last thing you did. You have to make sure you click EDIT>>STEP BACKWARD you can use that one as many times you wish and it will keep undoing!
1. Open PHOTOSHOP

2. Start a new document, name it and change its width and height to 12 inches each.
3. Select the PAINT BUCKET TOOL just under the tabs on the top you will see “foreground” change that to “pattern” on the side you will see a little square with a print. Click on the arrow down and you will have more to choose from. Now, here is where you can change to the ones you downloaded. On the right of that selection that opens up there is a little arrow pointing to the right. Click there and the list of all the patterns will appear.

4. This will be the background of you sketch. If you wish to have a simple color for the background then just don’t change the foreground and choose the color you want for the background
5. HERE IS THE MOST IMPORTANT PART OF USING PHOTOSHOP!!!! FOR EVERYTHING YOU USE ON YOUR SKETCH YOU HAVE TO CREATE A NEW LAYER!!! Hit CONTROL+SHIFT+N and a new layer will be created, you don’t have to give it a different name, just click OK.
6. Now choose the SHAPES tool, this will be called differently depending on the shape that is chosen, for example “rectangle tool” click on it and leave clicked until the shapes to right appear. Click on the figure you would like to use. YOU HAVE TO MAKE SURE THAT THE SHAPE IS UNCONSTRAINED, when you have click the shape tool on the top shapes will appear, if you click on the weird/funky flower one you will see the unconstrained thing I was telling about. This way you can shape the figure any way you want. But if you want a set size then just change the size on that same box, under fixed size.

7. The shape you choose will have the color that was there before. You can either just change the color or you can also give it a pattern!! Choose the paint bucket again and when you have chosen your pattern, click on the shape and a message will pop up.

Just click OK. I don’t know why! LOL (My uncle taught me and explained but that particular info flew away!)
8. CREATE A NEW LAYER FOR EVERY step you use on our sketch!!!
9. Create your picture mats; this is where the fixed shapes come in handy! I chose for the sample I am doing a 7 x 5 picture, my first mat is black and that is done at 7.50 x 5.50 my next mat is 7.25 x 5.25. You can move shapes by clicking on the MOVE TOOL it’s the first tool on the left side. DON’T FORGET TO CREATE A NEW LAYER!!!
10. Now comes the fun part! BRUSHES!!! Make sure you have the selected color you want! Click on the brush tool (on the left side) Most likely you will something that’s preset. Right click and you will see different brushes. On the right of that there is a little arrow pointing to the right, click on that and the list of different brushes will appear. Click on the one you want to choose and size it. On this you kind of have to play with it.
11. When you have chosen your brush, and are ready to put it onto your sketch, don’t move the mouse around just put it where you want it and click more than once. I do this because some of the images are very lite and I like my brushes to pop out! FOR EVERY BRUSH YOU CREATE A NEW LAYER!!
12. If you wish to move your image, click on the RECTANGULAR MARQUEE TOOL and select the brush right click it when you have selected it and click FREE TRANSFORM, if you right click again you can rotate image and do more, free transform allows you to move however you want. When you are done playing with brush, click on the RECTANGULAR MARQUEE TOOL again and click on image once so that it’s not selected anymore. It will ask you if you want to transform brush and you say yes!
13. CREATE ANOTHER LAYER! Choose another brush and keep playing! Don’t forget you can move them around!
14. If you want text on your sketch click on the T tool, if you hold it for a few seconds it will show you different ways you can use your text i.e. Horizontal or vertical text or even patterned!
I hope this helps you get started! I have only done 3 sketches myself so I am still learning!! Please feel free to contact me for ANY questions you have at scrapbookaholicbyabby@yahoo.com make sure you title your message Tutorial Question!
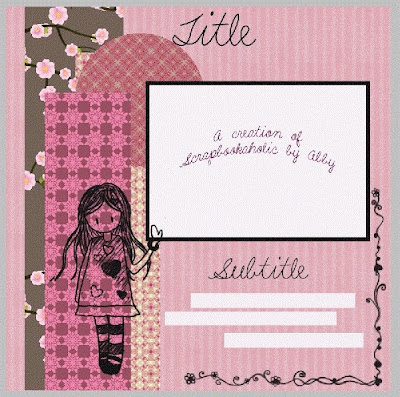
On to the CHALLENGE!!!
Create a layout any size using my sketch and add your project using Mr.Linky!! There are NO other rules! I will choose a winner using random.org by next Tuesday!
Oh wait!!! The prize!!!
COLLECTION OF ME & MY BIG IDEAS RUB-ONS!!
*Love sayings
*Inspirational sayings
*Baby Boy
*Vacation sayings
*Family Sayings
*Friendship Sayings
SOFT SPOKEN chain embellishments
2 Jolee's Stickers (Tennis racket and DayCare)

.JPG)
.JPG)
.JPG)
.JPG)
.JPG)
.JPG)
.JPG)
.JPG)
.JPG)


